home about me recipes morsels
Showing posts with label homemade. Show all posts

Saturday, June 2, 2012

Strawberry-Rhubarb Rickeys

Ahhhhh summer!  I love this time of year - loads of sunshine, longer days, flowers are a bloomin', baseball season is here and the cold drinks are flowing.  I love all things summer drinks and that definitely includes [but is not limited to] lemonade, ice tea, margaritas, beer, Arnold Palmer's, daiquiris and RICKEYS!

Have you ever had a rickey?  If so, aren't they one of the best inventions ever?  
If not, are you kidding me?  Did you not know they are one of the best inventions ever?! 
[I should also mention that Arnold Palmer's are also in contention for the numero-uno best summer drink according to moi award].

Regardless of your answer to the above question - rickeys are so incredibly simple to make that they MUST become a staple in your summer drink line up.

My usual go to rickey is a raspberry lime rickey but after having an abundance of rhubarb this past weekend, my mind went into overdrive and I knew I must run to the store and get some strawberries.  I am a huge fan of the strawberry+rhubarb combo so I decided to give it a go. Boy am I glad I did!

This drink was every bit as refreshing as I had imagined and was a little too easy to drink. Here is my tasty interpretation for you. 

Cheers!

Strawberry-Rhubarb Rickeys

2 ounces Strawberry-Rhubarb simple syrup [recipe below]
2 tsp fresh lime juice
2-3 ounces gin or vodka [optional - feel free to add more or less to taste]
Lemon-Lime flavored Seltzer
fresh strawberries and limes [for garnish]

sugar [for the rim]

Rub the rim of a large glass with a lime wedge and dip in sugar.

Fill glass with ice.

Combine first three ingredients in a cocktail shaker with a few ice cubes and give it a good shake or five or ten.
 
Pour into large glass and top with seltzer.

Stir mixture a few times to combine and garnish with limes and/or strawberries.


Strawberry-Rhubarb Simple Syrup
[Recipe modified from Country Living]
 
3/4 cup(s) rhubarb, trimmed and chopped
1/2 cup(s) strawberries, sliced and chopped
2/3 cups (s) granulated sugar
1/2 cup(s) water

In a 1-quart saucepan, combine rhubarb, strawberries, sugar, and water.

Bring to a boil over medium-high heat; cook until rhubarb is very soft -- about 10-15 minutes.

Cool mixture.  Once cool, place mixture in blender and blend until smooth.

Store in an airtight container, refrigerated, for up to four days.

Click here for a printable version of this recipe.
Pin It!

Wednesday, May 23, 2012

Double Chocolate Almond Joy Brownie Bars

Once upon a time - there was a delicious decadent brownie that fell in love with an even tastier almond joy and it was a match made in Heaven!

Trust me when I say that these bars are TO. DIE. FOR .  They very well might rank in the top three best things I've ever made.

For all the almond joy/coconut/brownie lovers out there - run to your local grocery store and stock up on these ingredients.  Making these ASAP will be the best decision you'll ever make!  I pinky promise that you will NOT be disappointed.

[Recipe adapted from my homemade brownie recipe]

Serves 12-16

3/4 cup butter, melted (1.5 sticks)
1 and 1/2 cups granulated sugar
2 teaspoons pure vanilla extract (
1 and 1/2 tsp for brownies, 1/2 tsp for coconut mixture)
2 eggs
3/4 cup all-purpose flour
1/2 cup unsweetened cocoa powder (I prefer Hershey's)
1/2 teaspoon salt
2 Hershey's special dark extra-large (4.25 ounce) candy bars (you can also use milk chocolate if you prefer)
14 ounces shredded sweetened coconut
14 ounce can sweetened condensed milk
1/4 cup almonds

Preheat oven to 350 degrees F.  Spray an 8x8 or 9x9  inch square pan generously with non-stick cooking spray.  You can also use parchment paper or foil to line pan but also spray generously with non-stick cooking spray.

In a large bowl - blend melted butter, sugar and vanilla.  Once well combined, beat in eggs one at a time.  In a separate bowl, combine - flour, cocoa and salt.  Slowly blend cocoa flour mixture into egg mixture.  Set aside.
Combine coconut, sweetened condensed milk and 1/2 teaspoon vanilla in bowl and combine.

Now the fun part starts!
Spread half of the brownie batter into prepared pan.  Unwrap chocolate bars and place side by side on top of brownie mixture.  Gently place coconut mixture on top of  chocolate bars and press down gently until even.  Distribute almonds on top of coconut mixture.  Place the remaining half of the brownie mixture on top and spread evenly.

Bake for 55 - 65 minutes.  Cooking time for these brownies is tricky.  You want to make sure the top layer cooks but the bottom layer does not burn - this is why I like to use a glass pyrex baking dish so I can gauge how they look on the outside as well as the inside.  The edges will be crisp but that makes them even more delicious.  You can insert a toothpick into the top layer of brownie to see if they need to be cooked longer.

Once fully cooked, cool completely on wire rack.  Refrigerate 3-4 hours or overnight before cutting.  I find that a pastry cutter is the best tool to cut these into bars.  You can also use a very sharp thick knife.  Enjoy!


Click here for a printable version of this recipe.

Want to share this recipe with friends and family?  Click the PIN IT button at the bottom of this post to pin this recipe to a Pinterest board.

Want to follow me on Pinterest?  You can find me here.
Pin It!

Sunday, May 20, 2012

Savory Zucchini Casserole

Happy Sunday! 

I hope you are all enjoying a nice weekend filled with relaxation and sunshine!  We have been so busy lately doing stuff around our house, including building our first massive above ground vegetable garden.  I cannot wait until we have fresh herbs and vegetables from our garden to make this tasty recipe I have to share with you today.  

I got this recipe from my friend Ron's mom.  Ron constantly used to talk about this casserole so I knew that I had to try it.  His mom was so kind to share this recipe with me and now it's one of my go-to summer recipes.

The consistency of this recipe is less like a true casserole and more like a corn bread (minus the corn - of course).  I love to make this savory casserole to serve alongside pulled pork and BBQ baked beans.  It is the perfect addition to a great summer meal!

Savory Zucchini Casserole

Serves 12-15

3 cups zucchini, shredded (about 2.5 medium zucchini)
1/2 cup onion, chopped or shredded
1 clove garlic, minced
1/2 cup freshly grated parmesan
1 cup Bisquick
1/2 teaspoon salt
freshly cracked pepper, to taste
1/2 teaspoon garlic powder
Oregano (1 tsp fresh or 1/2 tsp dried)
1/2 cup veggie or canola oil
4 eggs

Preheat oven to 350 degrees F.  Spray a 9x13" casserole dish with non-stick cooking spray.  Set aside.

Shred zucchini using a hand shredder or food processor.   The shredding blade on the food processor gets this task accomplished in less than 2 minutes.  I also use the same blade to shred the onion right into the zucchini mixture.

Combine zucchini, onion, garlic and parmesan cheese in bowl.  Combine Bisquick, salt, pepper, garlic powder and oregano is separate bowl. 

Add oil and eggs to zucchini mixture and gently stir.  Once combined, add Bisquick mixture and stir until moist and blended.

Pour mixture into greased casserole dish and bake until top is light golden brown - approximately 35 to 40 minutes.

Cool on wire rack and cut into squares.  Best served warm or at room temperature.  Enjoy!

NOTE:  I also used the shredding blade on my food processor to shred the parmesan cheese.  I found this to be easy and super simple.  If you do not have a food processor, a hand grater works just as well.

Click here for a printable version of this recipe.

Stay tuned this week for lots of great posts and recipes - including the marriage of these with one of my favorite candy bars (OMG - to die for!) and my famous banana bread.  I'll also be blogging about our veggie garden and of course, my favorite little guy's birthday.  I can't believe my sweet sweet little Henry is going to be four years old this week!!

Pin It!

Wednesday, May 16, 2012

Cheese Danish Deliciousness

There is nothing more delicious - in my opinion - than cheese.  I LOVE cheese.  I eat it every day.  I thank the Lord for it's goodness.  And then I cry because my jeans don't fit.... so I drown my sorrows by eating more cheese.  Anyway - I was only a teeny weeny half pint when I ate my first bite of cheese + breakfast deliciousness. Ohhh danish... the most delicious, sweet, heavenly, decadent creation in all the land and I was one happy girl.  Since that very day - a long, looong, loooong time ago - I've been on a quest to find the perfect cheese danish recipe.  I was determined to crack Entenmann's delicious code and I've made it my life goal a mission to replicate that.  I shared these goodies with some of my co-workers and many agreed that it was one. tasty. recipe.


While this recipe is pretty darn close to Entenmann's it still isn't perfect and I can't wait to officially crack the code when I make a homemade sweet bread crust on my next attempt.  In the meantime, this recipe is just too good not to share.  I hope you all enjoy!!

 
Easy Cheese Danish 
[Recipe modified from Ina Garten]

Serves 6-9

Cheese Filling:
8 ounces cream cheese, at room temperature
1/3 cup granulated sugar
1 extra large egg yolk, at room temperature (you can substitute two small egg yolks here as well)
2 tablespoons ricotta cheese (you can also substitute 2 tablespoons sour cream)
3/4 tablespoon pure vanilla extract
1/4 tablespoon pure almond extract
1/8 teaspoon kosher salt
zest of 1 lemon
Optional:  1/4 pint of fresh berries or 3-4 tablespoons jelly/jam

Base:
1 can of croissant rolls

Topping:
1/2 cup powdered sugar
1 tablespoon heavy cream
little dash pure vanilla extract
little dash pure almond extract

Preheat the oven to 375 degrees F.  Line a baking sheet with parchment paper or a Silpat (silicone baking mat).

In bowl (you can use a stand mixer or a hand mixer for this step) - combine cream cheese and sugar at a low speed until combined and smooth.  Once smooth, add the egg yolks, ricotta, vanilla, almond extract, salt and lemon zest.  You only want to mix until ingredients are just combined.  Over mixing/whipping will alter the consistency of the danish.  Mixture should NOT be runny.

Unfold the can of croissant rolls onto the parchment paper or Silpat.  Gently press together all perforated seams.  Spread cheese mixture down the center of the croissants.  NOTE:  If you are adding berries/jelly/jam, now is the time to do it.  Place them/it directly on top of the cheese mixture.

With a sharp knife, gently slice croissant roll on either side of filling in strips - at an angle.  I usually make about 10 cuts per side.  Gently fold strips on top of cheese mixture alternating sides.  Refrigerate for 10 minutes before baking.

Bake the danish for approximately 20-25 minutes, rotating the pan once halfway through baking.  As oven times may vary, I suggest checking on the danish as early as 18-19 minutes.  The top should be golden brown and cheese filling should spring to the touch.  To ensure filling has set, insert toothpick into center of filling.

Cool danish on wire rack.  I find that danishes are best served at room temperature.

Mix together powdered sugar, cream, vanilla and almond extract to desired consistency.  I sometimes have to add a little more sugar or a little more cream.  Drizzle icing over danish.  Cut into strips and enjoy!


Click here for a printable version of this recipe.

Pin It!

Sunday, May 13, 2012

Carl's Homemade Bagels

As my first guest post on this blog it was voted that I make bagels. Being an avid distance runner there is really nothing more fitting than the bagel. Carbohydrates are my friend. I eat a bagel every morning as a mid morning snack. It's a great source of calories and energy before my lunch time run.

Although I usually opt for the store bought bagels, there is nothing better than freshly baked bread. I started making bread a few years ago when Nicole got me all the necessary tools for Christmas.  I find the more bread you make the better you get at it. I have gotten pretty good at judging the dough by feel but I definitely still have a lot of room for improvement.

The basic recipe for these bagels comes from the book  "The Bread Baker's Apprentice" by Peter Reinhart.  I have modified some of the measurements over the years to perfect what I consider a pretty darn good bagel.  This book really is great and I consider it to be the authority when it comes to bread making.  I have made a lot of recipes from this book and highly recommend adding it to your personal library.

First - let's start with the ingredients:
  • 7 cups flour (4 cups for first step and 3 cups later on in the recipe)
  • water (room temperature)
  • 1 and 1/2 teaspoon instant yeast
  • 2 and 2/4 teaspoon salt
  • 1 tablespoon honey
  • 1 tablespoon baking soda
  • yellow cornmeal
  • Kosher salt, poppy seeds, dehydrated onion/garlic etc. (toppings)
Start by mixing 4 cups of flour and 1 teaspoon of yeast in a large bowl. Add 2 and ½ cups of water and mix until all ingredients are hydrated. The consistency should be like that of pancake batter. You really have to feel the consistency to know when it is right - my mixture was too dry so I added more water. 


Cover the bowl with plastic wrap and let sit for 2 hours. The mixture should nearly double in size and be bubbly.


After 2 hours have passed the recipe says to add 3 and ¾ cups of flour, 2 and ¾ teaspoons of salt, ½ teaspoon of yeast and 1 tablespoon of honey. Mix these ingredients together until they form a smooth ball. I only added 3 cups of flour and my dough was much too dry so I had to add more water. Add water very sparingly as a little moisture goes a long way. Once the dough is formed into a smooth ball take it out of the bowl and knead for about 10 minutes until the dough becomes stiff. If it is dry and starts cracking sprinkle water on it. If the dough is sticky add more flour.


Divide the dough into 4.5 ounce pieces or 12 equal size pieces. I weigh out each piece so that the size of my bagels are consistent. I ended up with 14 bagels. 


Roll each piece into a ball and cover with a damp paper towel. Let the dough sit for 20 minutes.


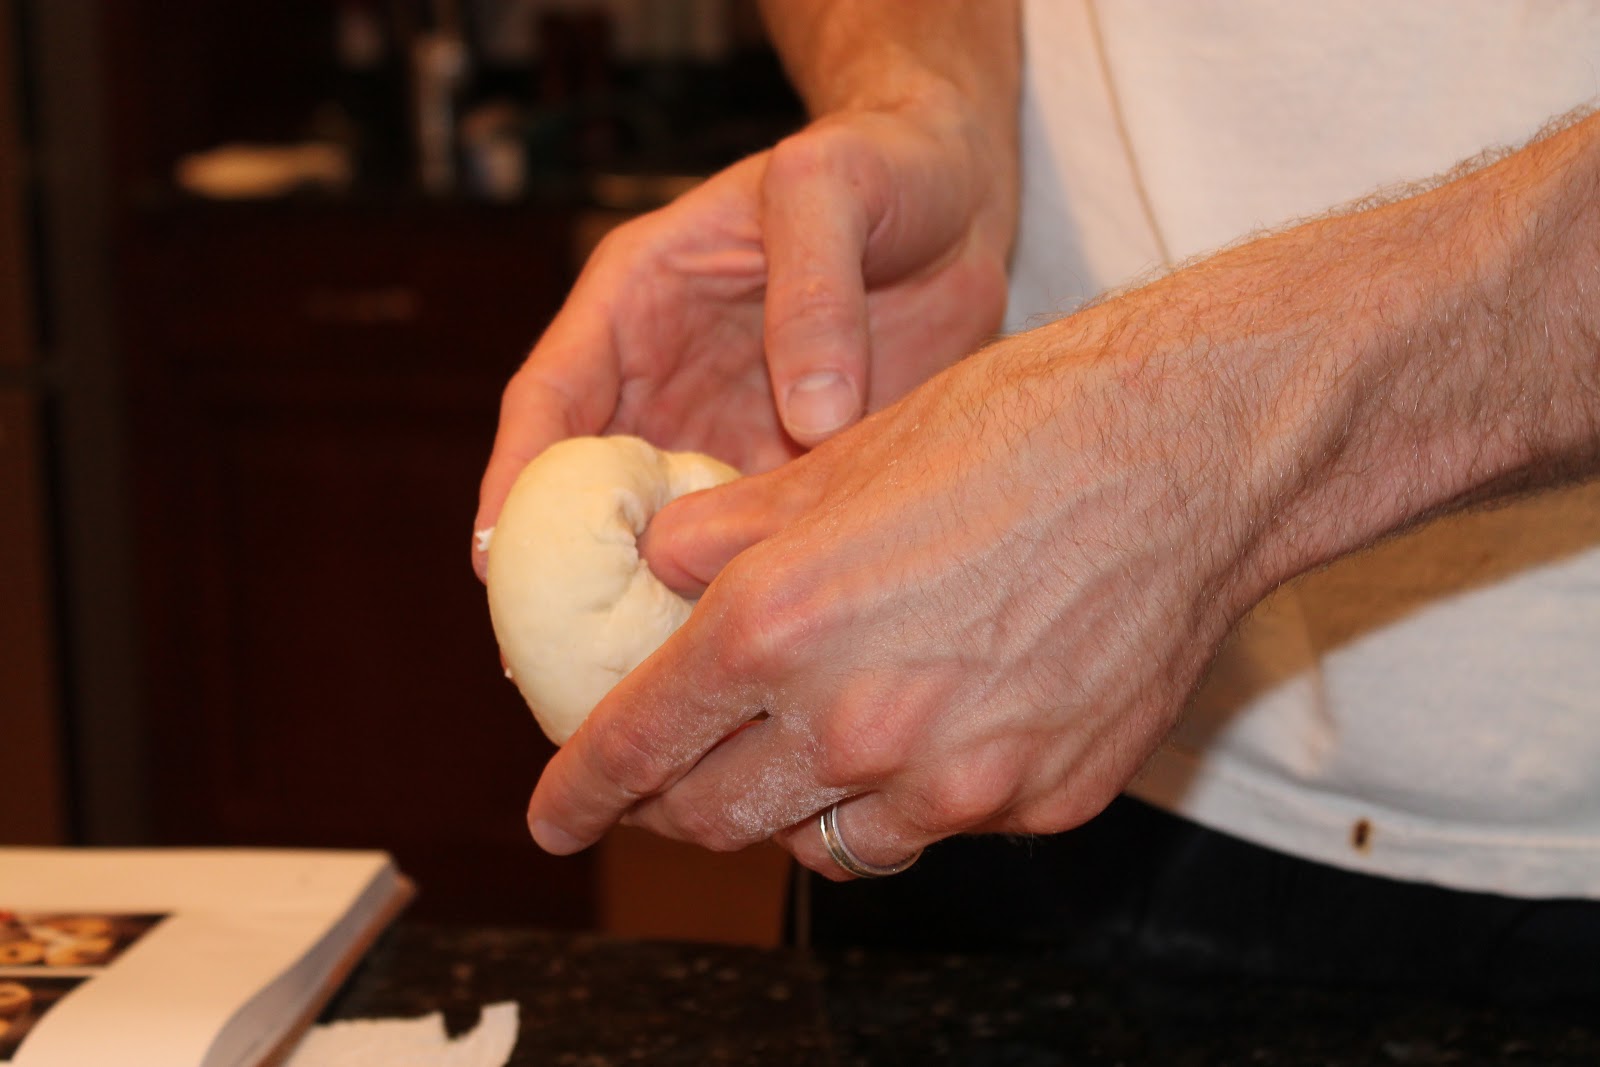
Line 2 baking pans with parchment paper and spray with oil. Take one of the balls and stick your thumb through the middle to form a hole and then work the dough into a bagel shape. 


Place the bagels on the baking pan, mist with spray oil and cover loosely with plastic wrap for 20 minutes. 


To test whether the bagels are ready to go into the fridge drop one into a bowl of water. If the bagel floats within 10 seconds they are all ready to go in the fridge. 


If not try every 10 minutes until it floats. Place the bagels in the fridge overnight. Note: The bagels can stay in the fridge for up to 3 days but I always make them the next day.

The next morning bring a pot of water to a boil and preheat the oven to 500 degrees. Add 1 tablespoon of baking soda to the pot. Place 3 or 4 bagels into the water allowing them to boil for 1 minute on each side. Sprinkle the parchment paper with corn meal and return the bagels to the baking pans. Once all the bagels have been boiled top with desired toppings. I used poppy seeds, kosher salt and left some plain.


Put the pans in on middle racks in the oven.  After 5 minutes rotate the pans to ensure even cooking. Let them cook for another 5 to 10 minutes. Remove from the oven once the bagels have started turning light brown.


So what's with the heart shaped bagel in this picture? A few years ago I made Nicole heart shaped bagels for Valentine's day. Now I've made it into a little tradition. And for some odd reason she always says that bagel tastes the best. 

Using a spatula transfer the bagels to cooling racks. 15 minutes later your bagels are ready.


Slather with butter, jam/jelly, cream cheese, lox or whatever your heart desires.


Do a celebratory dance...

and/or push up...


and/or jumping jacks...


Thank you to my wife for letting me share this post with you and thank you all for voting for this post on the Baking it on My Own Facebook page! If you have any questions about homemade bagels please leave a comment below and I'd be happy to try to answer them.

Until next time...
Pin It!
Related Posts Plugin for WordPress, Blogger...